Section
| Watering |
| Soil |
| Feeding |
| Temperature |
| Seed Raising |
| Close Page |
In response to many requests to the MSG Committee for information on cultivation I have been cajoled into writing a few lines on my own methods. These notes are aimed at newcomers to Mesemb growing, expert growers, please pass on.
The experience on which these notes are based has been gained from growing these plants for 22 years in the south of England (so Southern Hemisphere growers please advance any months mentioned by 6) on sites where some of the available sunlight is lost through shading by trees.
The following aspects of cultivation will be considered; watering, soil, feeding, light, temperature and seed raising.
Watering: For Mesembs to grow well they must be watered at the correct time of year otherwise at best they become atypical and at worst they die. The majority of the genera of interest come from Southern Africa and the climatic conditions, in particular the rainfall seasons, vary enormously over this vast area! Account must be taken of this variation when growing these plants in our greenhouses.
Tables showing watering times for the different genera are useful and reduce the loss of plants during the learning process. The only such table I could find back in 1969 was in "Cacti and Succulents" by Walther Haage and this is certainly not now recommended. More recently others have appeared including one by Suzanne Mace in Vol 5, number 3 of this bulletin. I have to disagree with this in a few cases, for example I find Cylindrophyllum is a Winter grower (Sept-April) and flowers in April and, to fill in a gap in this table, Maughaniella grows September-March and is in bud now (mid December).
In general I find "Growing The Mesembs" by the late Ed Storms [Ed. the latest edition of this was titled "The New Growing the Mesembs"] a very good guide apart from the odd exception such as Herreanthus which, in the U.K. at least, is best watered from the time the old leaf pair dries out in July until just after flowering in late October. If in doubt as to the watering season first establish the habitat area for the genus in question in "The Genera of the Mesembryanthemaceae" by Hans Herre, which is suitable here - then study the rainfall periods in that area from for example the articles by Mel Roberts on the Climate of South Africa and Namibia in B.C.S.S. journal Vol 7, nos 3 & 4, and Vol 8, nos 1 & 2 or refer to page 42 of "The Illustrated Encyclopedia of Succulents" by Gordon Rowley.
Other points to note are that I use rainwater whenever possible and that I do not top dress my plants as I like to be able to see how dry the soil is before I decide whether and how much to water.
Soil : Avoid peat based and soil-less composts. Over the years I have simplified my methods and now base everything on John Innes No 3 (JI3) - a loam based compost with added fertiliser. For the majority of my plants I make up what I call a basic mix for which I use 6 parts JI3, 2 parts washed sand, 3 parts grit, 0.5 part Perlite (heat expanded volcanic material, very light in weight) and 0.5 part moss peat. The washed sand is obtained cheaply from builders merchants and I wash again in case of contamination by salts. I have difficulty obtaining a regular supply of good grit, I now use a mixture of grit of 4mm to 5mm combined with "Cornish" grit (horticultural grade, lime-free and washed) which is typically 2mm to 3mm.
When potting up winter growing plants such as Mitrophyllums I add more grit to the basic mix and for Conophytums I add more grit and leave out the moss peat. For Dactylopsis and Didymaotus the proportion of grit is as high as 50%. These proportions are only a guide, they are not critical. All my plants are grown in good quality (polypropylene) plastic pots.
Feeding : As I repot nearly all my plants each year and my basic mix already contains fertiliser, there is little need for more feeding. However some of the faster growing shrubby species are given a weak feed of Chempak 8 or Phostrogen, (two fertilisers readily available in the U.K.) occasionally.
Temperature : In winter I try not to let the temperature drop below 5 degrees C (41degrees F). I use an electric fan heater backed up when it is exceptionally cold by a paraffin heater. I feel that a few degrees higher temperature would encourage genera such as Gibbaeum, to flower more regularly. In winter I make use of a warmed bench one square metre in area (12 square feet) heated by a 75W cable on which almost rooted and cuttings are placed with young Conophytum seedlings. in the summer the temperature in the greenhouse sometimes reaches 32 degrees C (90 degrees F) but rarely goes above this.
Light : In the summer I lose about 25% of direct sunlight through shading by trees but I still find I need to use "Coolglass" (a preparation similar to thin whitewash) and green plastic net shading from April to September. The new Conophytum bodies are particularly vulnerable to burning when they emerge in the latter half of July.
Seed Raising : The method described here has been developed over many years but I am sure there are others which are equally successful. I sow all my seed in March and April as I have tried sowing in November and in January but I have found there is no advantage in doing so. I have also seen the results of growing seed under artificial light but I was not impressed.
I use two home made electric light bulb heated propagators, one takes a Stewart tray 14 inches x 8.5 inches containing 24 x 2 inch square pots and the other takes two such trays so 72 species can be raised at a time. The propagators are placed out of direct sunlight in a cool south facing room. For Conophytum seed I try to maintain a temperature of about 17 degrees C (60-65 degrees F) and for most other mesembs 21 degrees C (65-75 degrees F). Each species is sown separately in a 2 inch square pot. A batch of 24 pots is prepared as follows: Cotton wool wicks are pulled through the drainage holes in each pot with tweezers, then washed sand which has been dried is poured into each pot until the wicks are covered followed by my basic mix up to 6mm (0.25 inches) below the final required level. The final 6mm is added by sieving the normal mix over the pots using sieve with 1.5mm mesh. This procedure may sound laborious but when carried out on a production line basis it does not take long. The labels for each of the species to be sown are written out - all the habitat data is put on the back of the label. Each pot is then placed in turn on a sheet of plain white paper and the seeds from one packet are tipped out onto a second sheet of paper which is slightly folded with a V at one edge. The number of seeds is recorded then they are gently tipped onto the surface of the soil in the pot, if any go astray they can easily be retrieved. A layer of coarse sand one grain deep is sprinkled on top of the seeds and the label is inserted. When 24 pots have been completed they are all placed in a 14 inch x 8.5 inches tray which is then filled and topped up with water until the pots are thoroughly soaked. The pots are removed, allowed to drain then placed in a similar tray with a fitting, clear plastic cover which is then put on the propagator. When I estimate 80% of the seeds have germinated or no more are appearing - typically after 5 to 10 days - the pot is removed to avoid damping off and is placed in an uncovered tray in shade under the greenhouse benches. When the pots appear to be drying out they are again soaked with water as described above.
I try to sow Conophytum seed before the end of March then I grow them fast until July when they are encouraged to dry off. When the first body has dried out to a skin they are watered again until the end of February of the following year. In this way a year's growth cycle can be gained and sometimes multi-headed plants result after only 6 months from seed.
I make use of several sieves with different mesh size for grading various materials and all have been made by gluing (Aralditing) circular discs of metal mesh or gauze into the bottom of metal cans.
Electricity is not essential for seed raising. For a few years I used a home made propagator warmed by a small paraffin heater with a 6mm wick - this was only used in the greenhouse due to the potential fire hazard.
I hope that these notes will help to answer at least some of the questions raised and that they will prove useful to new enthusiasts.
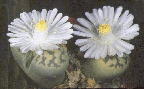
Lithops dorotheae